
A CUPS and eCS (OS/2) How To 
CONTENTS 
- Printing with CUPS
1. Brief Preamble 
Hopefully this text will provide a clear enough "How To" for anyone to be able to follow.
I am using my experience of, firstly, getting a printer working with CUPS itself; and then, creating an OS/2 desktop printer object that is capable of outputting print jobs through CUPS.
The following text may refer to specific drive letter(s) that should be changed to reflect the correct drive letter on your systems. Most of the paths used are specific to the CUPS installation; those that are not may need to be changed for your system.
2. Why install CUPS? What is it? 
To answer the "what is it" part: CUPS is the Common Unix Printing System. In a nutshell, it's a generic framework for printer driver packages. You install CUPS plus a driver package that supports your printer, and if all goes well you can print. :-)
Why install CUPS? Simply put: because it is capable of supporting a lot of modern printers and is continually being updated to support more. The old OS/2 printer drivers are not that good with new printers. If you have a native PostScript printer, you can probably get it more or less working with some fiddling, since OS/2 supports PostScript generically. But for most consumer-level printers, it's a different story. If you are lucky enough to find a driver that works with your modern printer, those drivers will not be updated to take advantage of all the features... whereas the CUPS driver will.
In short, CUPS can provide drivers for more current printers — and should provide many extra capabilities missing from the OS/2 drivers.
What does it support? Support for actual printers is handled by the individual driver packages. There are three basic packages available for OS/2 (not counting a couple of smaller and more experimental ones which are beyond the scope of this document).
- Gutenprint (the biggest and most commonly-used driver package), list of supported printers: http://gutenprint.sourceforge.net/p_Supported_Printers.php
- SpliX (supports various Samsung and Xerox printers), list of supported printers: http://splix.ap2c.org/
- HPLIP (supports various Hewlett-Packard printers), list of supported printers: http://hplipopensource.com/hplip-web/supported_devices/index.html
How does CUPS work? 
You can think of CUPS as an emulation layer that presents all its printers as PostScript printers, even if (at the hardware level) they aren't actually. This allows all applications to submit print jobs as standardized PostScript files (either themselves or by using a system PostScript driver), and CUPS does the job of converting them into the printer's own native format. If you're interested in the technical details, the CupsFaq has more information.
In terms of the actual implementation, CUPS itself runs as a background server (daemon) with its own internal spooler. This daemon is responsible for managing all defined CUPS printers. Now, this is entirely independent of OS/2's normal printing system, which knows nothing about CUPS. So we need to also create a regular OS/2 printer object and queue that is capable of receiving print jobs from applications. Then we configure this printer object to redirect all of its print jobs to the correct queue within CUPS, by creating a virtual "port" that points to the CUPS daemon rather than to a hardware port. CUPS itself ultimately takes care of communicating with the actual hardware. See below for more information.
This HOWTO describes how to set this up. The object is to end up with a desktop printer object that prints seamlessly to the printer, but which uses CUPS to take advantage of the extensive hardware support that provides.
3. List of Required Software 
The CUPS port is available at http://svn.netlabs.org/ecups/wiki/CupsPort. You can download the software in WPI format or as individual ZIP files. In either case, you will need the following products.
Always required:
- The basic CUPS package (this is the CUPS daemon and supporting files).
- Ghostscript for OS/2 — version 8.71 is recommended, as later versions still have some outstanding issues with CUPS.
- At least one of the following driver packages (choose the one which supports your printer):
- Gutenprint (many printers)
- SpliX (many Samsung & Xerox printers). Note that SpliX also requires custom GCC runtime, which is included in the WPI package, or available separately from http://smedley.info/gcc432.zip
- HPLIP (various printers from HP)
- CUPS port driver (CUPS.PDR). If you use the WarpIN packages, this is included in the
cups-base-*.wpiarchive - The eCups OS/2 printer driver, either ECUPS.DRV (for Gutenprint and SpliX) or ECUPS-HP.DRV (for HPLIP). These are modified versions of the standard OS/2 PostScript driver which include various fixes needed by CUPS.
- LIBC runtime files required for CUPS and other components. (You may have these already, especially if you are running eComStation).
These are described in more detail below.
May be required:
- USB helper driver (required for USB printing only): http://en.ecomstation.ru/projects/usbtools/download/usbcalls-20060807.zip (again, you may have this already, especially if you use a recent version of eComStation)
PRNDRV.EXEis a useful program that can "clean up" printer entries in the INI files (not actually necessary for using CUPS, but can be very useful if you do a lot of creating and deleting of printers): http://www.os2site.com/sw/comm/faxworks/prndrv.exe- Printer 'wizard', a graphical interface that largely automates setting up new printers: http://www.altsan.org/os2/printing/#cupswiz
Brief description of the software packages 
CUPS consists of several packages that work together to provide emulated PostScript printing on raster printers. The core components on all platforms are the CUPS daemon, Ghostscript, and the driver packages (Gutenprint, Splix, HPLIP etc.).
The remaining packages are specific to the OS/2 port (a.k.a. eCups):
- The LIBC and GCC files are required support files (the GCC runtime is required by Splix).
- PRNDRV.EXE: a useful command line utility for listing installed OS/2 (not CUPS) printers, and deleting those that are no longer wanted. (Note: Be careful when using "
prndrv -d", as it is very easy to accidentally delete important INI file entries; see the CupsFaq for more information.) - The eCups printer driver (ECUPS.DRV or ECUPS-HP.DRV) is a customized version of the OS/2 PostScript driver (PSCRIPT.DRV) which has most of the popular CUPS PPD files already imported, and can be updated as new printers become supported in CUPS. It also has a few tweaks and bugfixes to make it work better with CUPS. (For this reason, using the original IBM PostScript driver for CUPS printing is not really recommended, although it may happen to work for you.)
- The eCups printer port driver (CUPS.PDR) provides the "hook-up" between an OS/2 printer object/queue and the actual CUPS printer.
¶ The port driver component in particular is crucial, because normal OS/2 applications only know how to print to an OS/2 printer object — not a CUPS printer! What happens is that the OS/2 printer object sends print data to a port (like a parallel/serial/USB port or an LPR network queue, and so on) which is defined by a port driver. In this case, we are implementing another type of port to be available alongside these. This driver allows the OS/2 print "engine" to talk to the CUPS daemon, which turn talks to the physical printer either over the network or over a USB connection (using what it calls a "backend", which is basically CUPS's own internal equivalent of a port driver).
Note that we don't use the OS/2 USB port driver when using a USB attached printer via CUPS — we always use the CUPS port driver and then let the CUPS daemon control the physical IO traffic to the printer. The same is true for other connection types like network connections — in all cases, CUPS manages the connection.
As far as CUPS goes internally, the data flow is as follows:
CUPS tools (admin webpage, cupslpr.exe, etc.) —> CUPS daemon —> CUPS "backend" —> PRINTER
The above suffices for printing using CUPS's own internal mechanisms. What the port driver does, in conjunction with an OS/2 printer object, is allow normal OS/2 programs (which know nothing about CUPS) to print to CUPS printers. So the data flow becomes:
Application —> OS/2 printer object —> eCups PostScript driver (ECUPS[-HP].DRV) —> CUPSx port (CUPS.PDR) —> CUPS daemon —> CUPS "backend" —> PRINTER
4. Installation 
Installing with WarpIN 
There are now WarpIN (WPI) install packages available for eCups (see the CupsPort page). It is generally recommended that you use these, as they automate some of the trickier configuration steps (especially when upgrading various components from earlier versions). On the other hand, they are still somewhat experimental, and are not always guaranteed to include the very latest versions of all components.
Download the required WPI packages into a single directory. You will need:
- The main CUPS package (
cups-base-xx.wpiwhere xx is the version number of CUPS); this includes both CUPS itself, and the CUPS port driver. - Ghostscript (version 8.71 is strongly recommended, unless you are doing development testing).
- At least one printer support package (Gutenprint, SpliX, or HPLIP).
- The ECUPS printer driver in most cases, or alternatively the ECUPS-HP printer driver if you are installing HPLIP specifically.
Install the selected packages by double-clicking on the cups-base-xx.wpi file from the Workplace Shell. Follow the instructions shown in the installer.
Once the installation completes, you should be able to continue with creating and configuring a printer in CUPS.
Installing manually (from the ZIP files) 
Basic manual installation consists of unzipping most of the packages into the root directory of a selected drive. It doesn't have to be the boot drive, but they must all be unzipped to the same (non-FAT) drive.
cups-*.zipneeds to be unzipped into the root directory, thereby creating the\cupstop-level directory.- Ghostscript needs to be unzipped into
\gs— so that you end up with for example x:\gs\gs8.71(some zip packages contain the\gsupper directory, some don't — so make sure you end up with the correct directory structure). - The driver package(s) you will be using (
gutenprint-*.zip,hplip-*.zipand/orsplix-*.zip) must be unzipped into the root directory on the same drive. This will add various required files to the\cupsdirectory, and in the case of Gutenprint will also create the\gutenprinttop-level directory.
Once you have done the above, you should have the following directories off the root directory of your chosen drive:
\cups
\gs
\gutenprint(if using Gutenprint)
Have a read of the \cups\readme.os2 before proceeding, to get an idea of what you are going to do. Pay particular attention to the need to check/modify the Ghostscript path in \cups\lib\cups\filter\pstoraster.
There are other required files which go into a couple of different locations:
- The port driver is needed to enable printing from applications.
CUPS.PDRmust be placed in\OS2\DLLon your boot drive so that the port install dialog can find it. PlaceCUPSLPR.EXEinto the\TCPIP\BINdirectory on whichever drive TCP/IP is installed to (usually the boot drive). - The
LIBC0*.DLLandGCC*.DLLfiles should be put into a directory specified within the LIBPATH — either\ECS\DLLor\OS2\DLLis fine.
Other files can be unzipped now or later as they are required:
- The ECUPS (or ECUPS-HP) printer driver can be put into a directory of your choice. You will point the printer install dialog to this directory during the install process; OS/2 will then automatically copy the files to
\OS2\DLL\ECUPS[-HP](which it will create if necessary). - If installing PRNDRV.EXE, just copy the file somewhere that's convenient for you.
Upgrading from a Previous Version 
Whether installing from WPIs or ZIP files, you can generally just install over top of the previous versions. (If you installed from Peter Brown's old eCUPS003.wpi, you might want to uninstall the corresponding packages from WarpIN before installing the latest WPIs — otherwise you'll probably end up with duplicated desktop objects and some orphaned entries in the WarpIN database).
When upgrading to the most recent release of Gutenprint, you are advised to manually delete the contents of \cups\share\cups\model\gutenprint\5.2\C before installing the new version — otherwise, you may end up with a large number of duplicate entries in the CUPS driver list. Unfortunately, even the WPI installer does not do this automatically yet. (This is not necessary when installing a version of Gutenprint prior to 5.2.7.)
If upgrading with the WPI packages, generally no additional steps are necessary. However, when upgrading from ZIP files, you will need to do a bit of extra work:
- When upgrading CUPS or any of the driver packages (Gutenprint, etc.), shut down the CUPS daemon (by terminating all running instances of
cupsd.exe) before starting.
- When upgrading either CUPS or Ghostscript, edit the file
\cups\lib\cups\filter\pstorasterand make sure the "prefix=" line points to your correct Ghostscript path.
- After upgrading Gutenprint, go into the CUPS web interface and do the following for all printers which use Gutenprint drivers:
- Open the printer details by clicking on its queue name under the Printers page.
- From the Administration drop-down, select "Modify Printer".
- Leave all current settings on the first two pages unchanged; just click on Continue until you reach the printer manufacturer/model page.
- Make sure the correct manufacturer and model for your printer are selected. Also make sure that the Gutenprint version shown in the driver name corresponds to the version of Gutenprint you just installed. Then click on Modify Printer.
Once done, it's a good idea to print a test page to make sure everything still works as it should.
Starting CUPS 
If you installed from the WarpIN packages, CUPS should have been started automatically, and you can skip this step.
To activate CUPS, start the program \cups\sbin\cupsd.exe. This program will run continuously (until terminated), so you should run it either in a dedicated session or as a background process using "detach".
You will presumably want to create a program object which does this, and place it in your Startup folder so that CUPS is started automatically at bootup. You can make the program run
in the background by specifying "cmd.exe" as the program name, then setting the parameters to "/c x:\cups\sbin\cupsd.exe" and the working directory to "x:\cups\sbin" (where x is the drive letter where CUPS is installed).
Alternatively, you can start cupsd.exe from either your \STARTUP.CMD or \TCPIP\BIN\TCPEXIT.CMD file.
Using the CUPS Web Interface 
")
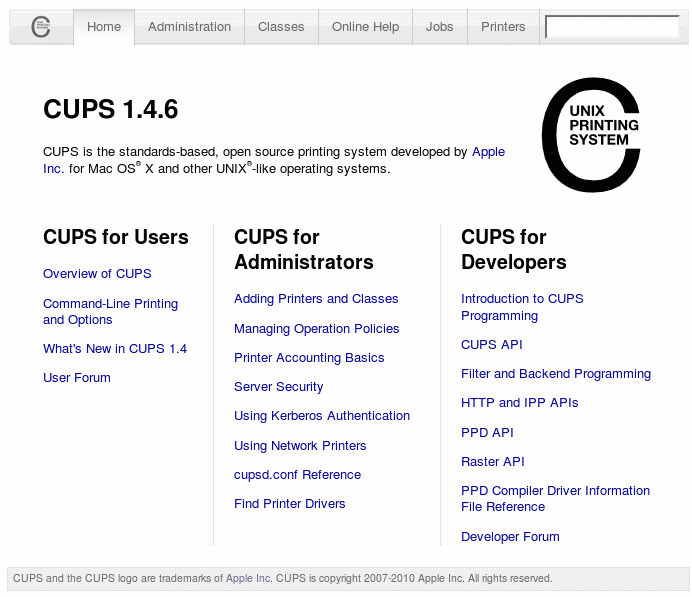
Once you've finished installing CUPS, you should make sure that it's up and running by opening the CUPS web interface. This is the main configuration tool for managing CUPS on your system. You can use it to create and manage printers, enable other computers to access your CUPS printers, diagnose potential problems, and so on.
Fire up your web browser and point it at http://localhost:631/. If all goes well, this should bring up the CUPS Administration GUI.
- If you get a "host not found" error, try using the address http://127.0.0.1:631/ instead. If that doesn't help, make sure that you have loopback enabled in your system TCP/IP configuration.
- Alternatively, if you get a HTTP 404 error, it means that the CUPS daemon is not running (or is broken somehow). Make sure you start
cupsd.exeas described above.
(In some recent CUPS versions, the logo graphic on the front page may be broken, but this appears to be a harmless cosmetic issue.)
5. Printing with CUPS 
There are two basic parts to setting up a printer with CUPS.
- Create and configure a CUPS printer queue. This sets things up so that CUPS itself knows about the printer and can print to it.
- Create and configure a desktop printer object. This allows OS/2 applications to actually print to the CUPS printer.
Unfortunately, this two-phase process makes things a bit complicated, especially if you have to do it manually. We'll describe how to do things using the simplified eCups GUI first, then discuss how manual setup works.
Using the eCups Printer Wizard 
A simple graphical user interface known as the eCups printer wizard (or "CUPSWIZ" for short) is now available for beta testing. It is highly recommended to try using this tool first, especially if you are new to eCups, as it automates most of the complicated stuff for you.
The eCups printer wizard is available for install via WPI, along with the other CUPS components: ftp://ftp.netlabs.org/pub/ecups/install/cupswiz-0_9_7.wpi, or at http://www.altsan.org/os2/printing/#cupswiz (along with some information and screenshots).
Note that this program still has a few significant limitations - in particular, printers are always created with default job properties. If you create a printer using this interface, you may wish to use the CUPS web interface afterwards, to check the defaults and adjust them as needed (and do the same in the WPS printer object as well).
Manual Setup 
In this section we'll describe how to set up CUPS-based printing manually, step by step. You may need to do this if the printer wizard (above) doesn't work for you. Or you may prefer to do things this way anyway — it's useful for understanding how it all works.
Creating & Configuring a CUPS Printer 
") First of all, if your printer is locally-attached (e.g. via USB port), make sure that it is turned on.
First of all, if your printer is locally-attached (e.g. via USB port), make sure that it is turned on.
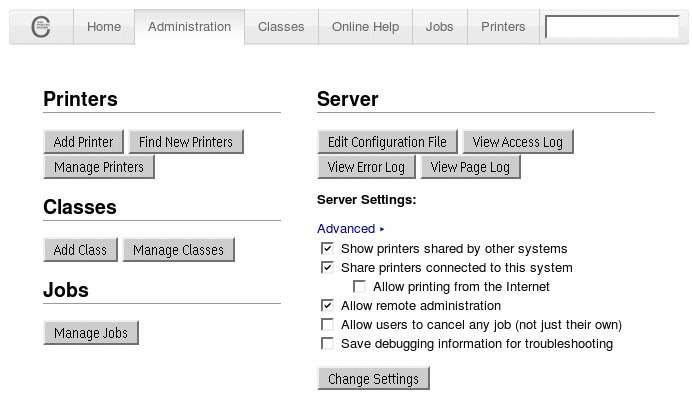
Next, go into the CUPS web interface, click on the Administration tab at the top, and then select the Add Printer button.
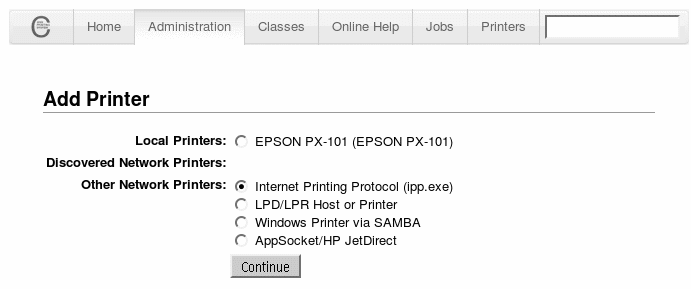
The examples that follow will describe the process for adding an Epson PX-101 colour inkjet printer.
Selecting the printer connection 
") When you select Add Printer, CUPS scans for available printers. Any locally-attached printers that it finds will be shown as selectable options on the following screen. It may also detect network printers, but this seems to be a bit hit-and-miss (it probably depends on how your network is organized, among other factors).
When you select Add Printer, CUPS scans for available printers. Any locally-attached printers that it finds will be shown as selectable options on the following screen. It may also detect network printers, but this seems to be a bit hit-and-miss (it probably depends on how your network is organized, among other factors).
On this screen, select the connection that is appropriate for your printer.
¶ Local printer (USB)
At the moment, the only local connections that are supported directly are USB. There is a workaround which can be used to enable printing via parallel port, but it requires some special setup; see below.
It has been reported that some older versions of the operating systems USB support files can cause problems, so please ensure you have the latest versions of the OS/2 USB stack as well as USBCALLS before you attempt this configuration.
If your USB printer is connected and powered on, it should show up as an option on this page. This assumes, of course, that everything is working as it should. Refer to the box below if you are having trouble getting your USB printer recognized by CUPS.
If your CUPS version is older than 1.3.11, you may need to download the USB backend separately from http://download.smedley.info/cups-usb-backend-20090309.zip and install it by unzipping into the >\cups\lib\cups\backend directory. However, all recent releases of CUPS include this file already.
To verify that the USB support is working, open a command prompt and go to the \cups\lib\cups\backend directory. Make sure your printer is turned on and run usb.exe with no parameters. You should get a display like this:
DEBUG: list_devices
DEBUG: usb_find_busses=1
DEBUG: usb_find_devices=2
direct usb://EPSON/PX-101 "EPSON PX-101" "EPSON PX-101" "MFG:EPSON;CMD:ESCPL2,BDC,D4,D4PX;MDL:PX-101;CLS:PRINTER;DES:EPSON PX-101;" ""
If you don't get such a display, check that your USB support is working correctly and that you have connected the printer with a known good cable to a known good port.
¶ Parallel port connection
The OS/2 port of CUPS does not currently support printing directly to parallel printers but there is a workaround.
- Create an OS/2 printer object using the IBMNULL printer driver. Select LPTn as the Output Port in the printer object properties, where LPTn is the name of the parallel port to which the printer is connected.
- Start the OS/2 LPD service (
lpd.exe). To prevent LPD from printing the control file page (an almost-blank page with few lines of information good only for debugging purposes), specify the "-c" parameter. You can use the OS/2 TCP/IP Configuration notebook to configure LPD.
When creating the CUPS printer, select LPD/LPR Host or Printer and enter "lpd://localhost/printer_name" as the Device URI, where printer_name is the physical name (as shown on the Properties View page) of the OS/2 printer object just created.
For example: If you created a desktop printer with the object name "Canon iP4000", open the Properties for that printer and check the name displayed on the View page. If the Physical name shows "CanoniP4", the device URI in CUPS should be "lpd://localhost/CanoniP4".
| Field | Description | Example |
|---|---|---|
| Device URI: | Address of locally-shared LPD printer | lpd://localhost/CanoniP4
|
Thanks to Rodney and others who supplied the above information regarding using locally attached printers with CUPS.
In fact, the current CUPS port does include a parallel port backend (driver), but it is completely untested due to the fact that none of developers/testers actually has a parallel-port printer. So the above workaround may or may not still be necessary.
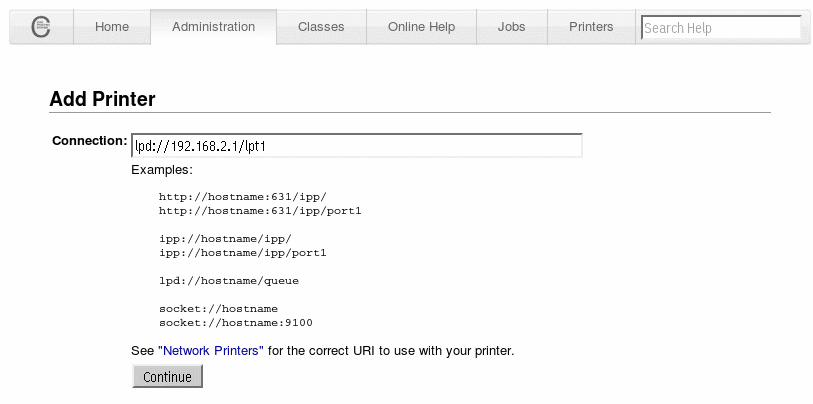
¶ Network printer
These options allow you to connect to a network printer using various supported protocols. If the printer was not automatically detected, the following screen will prompt you to enter the necessary connection information in the form of a URI (a string specifying the connection protocol and address in a URL-like syntax).
") The format of the URI indicates which network protocol to use, and specifies the necessary options. You have a choice of several different protocols; obviously, use whichever one your network printer or print server supports.
The format of the URI indicates which network protocol to use, and specifies the necessary options. You have a choice of several different protocols; obviously, use whichever one your network printer or print server supports.
- Internet Printing Protocol (IPP) is the newest and most advanced; the URI format is "
ipp://server[:port]/printer[?option=value[&option=value]]" - LPD (or LPR) is the oldest and most widely-supported; use the URI format "
lpd://[userid@]server[:port]/printer" - AppSocket (also called JetDirect) is also widely used; use the URI format "
socket://server[:port]" - Samba is for printers which are being shared out via Windows networking, IBM LAN Server, Peer for OS/2, or a Samba server. Use the URI format "
smb://[userid[:password]@]server/printer"
Most TCP/IP network printers use either LPD or AppSocket (just try one or the other if you're not sure). For shared printers on a Windows server, use Samba.
If you installed CUPS from ZIP files, be aware that support for Samba is not included by default. If you want to use Samba, you need to first obtain the Samba Client Utilities package from http://svn.netlabs.org/samba. Extract the file smbspool.exe, rename it to smb.exe and place it into the \cups\lib\cups\backend directory. You should then be able to use the CUPS Samba support.
The above is not necessary with the latest CUPS WarpIN packages, which include smb.exe out of the box.
| Field | Description | Example |
|---|---|---|
| Device URI: | Address of network printer | lpd://192.168.2.1/lpt1
|
Select the Continue button when you are done with this section.
Identifying the printer 
") On the next page, you will be asked to give your printer a name, which CUPS itself will use to identify it. You will also need to enter a description and a location; these are for the benefit of actual human beings.
On the next page, you will be asked to give your printer a name, which CUPS itself will use to identify it. You will also need to enter a description and a location; these are for the benefit of actual human beings.
| Field | Description | |
|---|---|---|
| Name: | A short name which CUPS will use to identify the printer | PX-101 |
| Description: | A human-readable description of the printer | Epson PX-101 inkjet |
| Location: | A brief description of where the printer is physically located | Home |
The Share this printer checkbox allows other computers on the local network to use this printer (by accessing the current computer as a print server).
Select Continue when you are happy with this section.
Selecting the printer model 
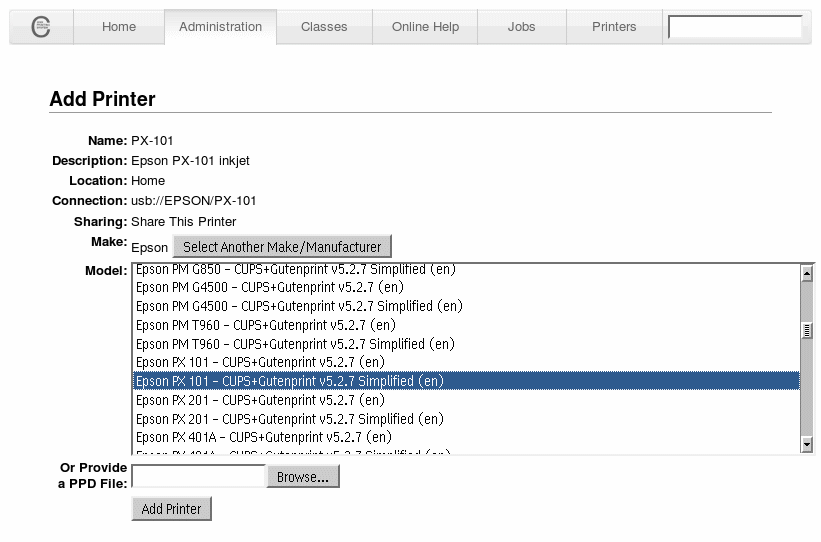
") This is where you select your printer's make and model. This is obviously pretty important as it determines the driver that CUPS will use.
This is where you select your printer's make and model. This is obviously pretty important as it determines the driver that CUPS will use.
There are two ways to specify the printer.
- In most cases, you will choose the manufacturer and printer model from the list shown. (If the printer was auto-detected by CUPS, the manufacturer will probably be preselected and you'll only need to choose the right printer model.) Generally, the list of models will show the printer model, followed by a dash and then the name of the driver package it belongs to (such as Gutenprint).
Note that Gutenprint in particular normally provides two alternate drivers for each printer: a standard driver, and one called 'Simplified'. The difference is in the level of configurability — the standard drivers support fine-tuning a number of advanced settings related to quality and colour balance. In almost all cases, you will prefer the Simplified drivers, which are more than sufficient for most needs.
- If your printer model isn't listed, but you have a PPD file for your printer, supporting one of the installed driver packages (Gutenprint, etc.), then you can specify that in the field at the bottom.
Note that any PPD file you provide here must be specifically written for use with CUPS in conjunction with one of the driver packages you have installed. You cannot use a standard (e.g. Windows) PPD for this purpose.
Click on Add Printer when you are happy with your selections.
Setting the default print options 
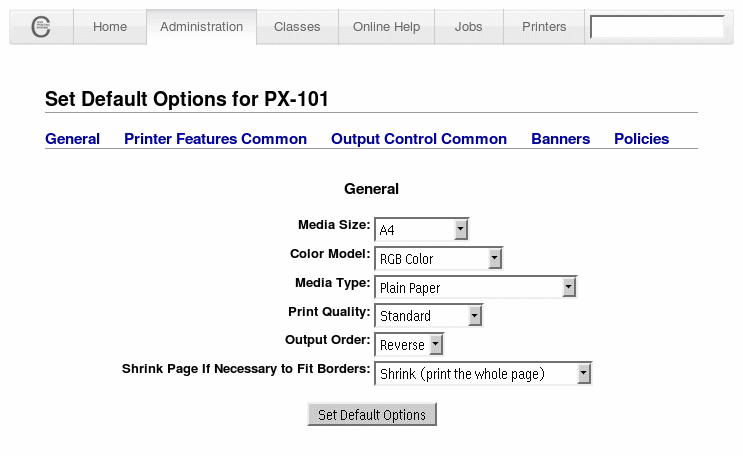
") After clicking Add Printer on the screen above, CUPS will load the options for the printer. This can take a little while — it is a good idea to have a look through and make sure the options look useable — especially the media size, type, and print quality settings.
After clicking Add Printer on the screen above, CUPS will load the options for the printer. This can take a little while — it is a good idea to have a look through and make sure the options look useable — especially the media size, type, and print quality settings.
You can use the links near the top to browse various different option categories. In most cases, you won't need to change much beyond the first page ("General").
When satisfied, click Set Default Options. CUPS should report that your printer has been configured successfully.
If you see an "Internal Server Error" message right after configuring a printer, just reload the top-level page of the CUPS web interface. This seems to be a (relatively) harmless bug that occurs now and then with some versions of CUPS.
Testing the CUPS printer 
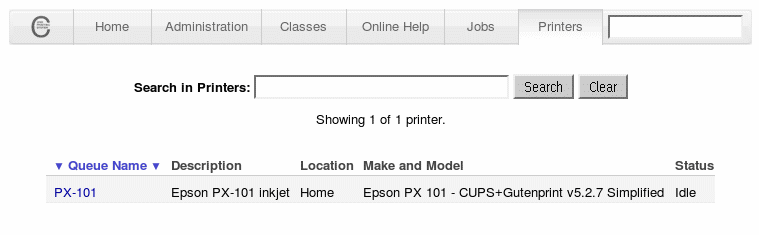
Click on the Printers tab. The new printer should be listed.
")
Click on the queue name to view the printer details.
Under the Maintenance dropdown, choose "Print Test Page". If all goes well the CUPS test page should pop out of the printer looking fine.
")
Printing from CUPS 
You should now be able to print files using CUPS's own internal tools.
The basic CUPS print command is \cups\bin\lpr.exe. (This is not the same as OS/2's native LPR command; this one is specific to CUPS, and is not installed to the system PATH.) Assuming you have the CUPS port driver installed properly, you can also use the cupslpr command (just a renamed version of the above), which should be available on the PATH.
You can use these programs to print standard PostScript (.ps) files from a command prompt:
cupslpr -Pprinter file
where printer is the name of the CUPS printer, and file is a previously-generated PostScript file.
If this all works then you know that CUPS is configured and working correctly.
Now the easy part is finished...
Creating a desktop printer object to use with CUPS 
Now to hook CUPS up to the rest of the system so that CUPS can be used for output by applications (like OpenOffice, Firefox, Lucide, PMMail, PMView... everything, basically).
Preparation 
If you haven't done so already, make sure you have the ECUPS or ECUPS-HP printer driver files on your disk — either by unzipping the ZIP file, or installing the WPI, into a directory of your choice. It doesn't really matter where this directory is; just make sure you make a note of the path, because you'll need to type it into the driver dialog (below). I suggest somewhere like \ECS\INSTALL\PRNDRV\ECUPS — you'll probably want to keep these files around in case you ever need to install another included printer model (or to import a PPD file).
If you installed CUPS from ZIP files, make sure that you remembered to install port driver. As a reminder, CUPS.PDR must be in your \OS2\DLL directory, and CUPSLPR.EXE needs to be in \TCPIP\BIN. (If you installed from the WPI packages, this was done for you.)
Creating the printer 
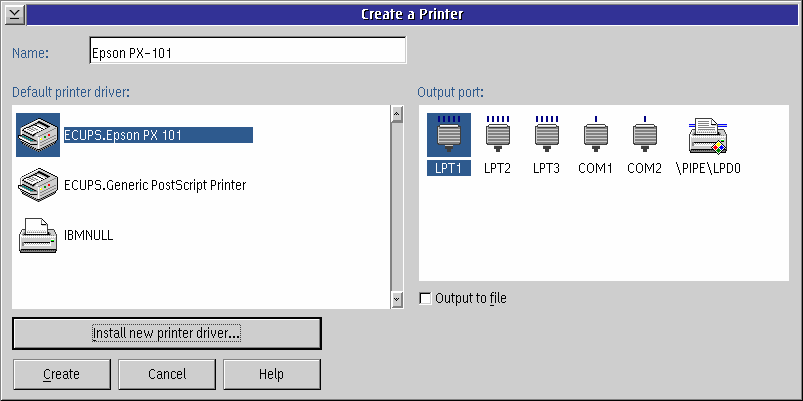
Open the desktop Templates folder and double-click on the Printer template or drag it to the Desktop in order to start the printer creation routine. If you have eComStation, you can also use the Install Printer object in the Printers folder and select "Standard printer" (may be called "Local printer" in some versions).

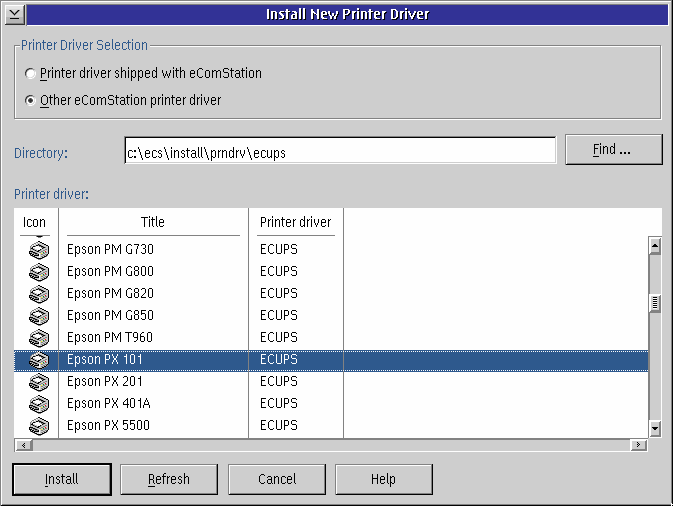
On the "Create a Printer" dialog, select the Install new printer driver button.
Select the Other eComstation printer driver radio-button, and enter the path to where you placed the ECUPS driver files. Then click on Refresh (at the bottom of the dialog) to see the list of printers.
Select your printer from the list and then click on Install. The driver for the selected model will be installed. (The "Install New Printer Driver" dialog may or may not close automatically when this is done; if it doesn't, just click on Cancel.)
If your printer model isn't shown in the list here, but was listed in CUPS, it means that the PPD for that printer was not pre-imported into the ECUPS (or ECUPS-HP) driver.
If you're running eComStation 2.x, you can use the InstPDR (printer driver import utility) to import a CUPS PPD into the ECUPS driver. Assuming that you already installed the printer in CUPS, the PPD file can be found under \cups\etc\cups\ppd.
If InstPDR is not available, the adventurous and/or technically inclined user can try to import the PPD file manually, using the PIN.EXE utility included with the driver files. However, you will have to 'clean up' the PPD using the CleanPPD script before you can import it (if you don't do this, PIN may simply fail to import the PPD, or else you may end up with strange errors or crashes when trying to print).
Alternatively, you can simply select "Generic PostScript Printer" from the list. This will prevent you from using the OS/2 Job Properties dialog to set print options from within applications — the default settings configured in the CUPS web interface will most likely always be used — but printing should more or less work.
(Note that using the eCups printer wizard (CUPSWIZ) will see all of this automated for you. But, of course, if you were using CUPSWIZ you probably wouldn't need to be reading this section in the first place...)

When you are back on the "Create a Printer" dialog, the new driver should appear. Select the driver, and also type a name for your printer into the entryfield at the top.
You also need to select an output port. We could install the CUPS port now, but it's simpler to just choose a temporary port like LPT1 for the time being, and set things up properly later.
Configuring the printer 
Now we need to configure the new printer object so that it prints through CUPS.
- Click mouse button 2 on the new desktop printer object, and select Properties.
- Select the Printer driver tab.

Verify that the correct printer driver is selected.
- Open the Job Properties dialog. The Paper size, Tray, Media Type, etc. should match the settings in the CUPS printer.

Save your changes when done.
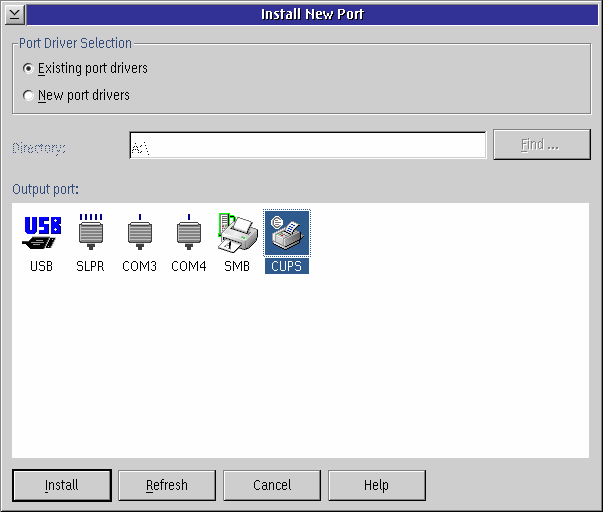
- Select the Output port tab.
Click on the Install new port button.

If the "CUPS" port option is not visible but the file
CUPS.PDRis in\OS2\DLL, select New port drivers and type in x:\OS2\DLL(where x is your boot drive), then click on Refresh. The "CUPS" port option should appear.
Select the "CUPS" port and click Install.

Note: You will need to install a separate "CUPSx" port for each CUPS printer that you wish to install (CUPS1, CUPS2, CUPS3, etc.).
- Double-click on the CUPSx port (or click mouse button 2 and select "Properties").

The required settings for the CUPS port are:
CUPS Server: "
localhost" (or use 127.0.0.1).
CUPS Printer Name: This should be the same name as used for creating the CUPS printer (in the CUPS web interface above).
Select OK when done.
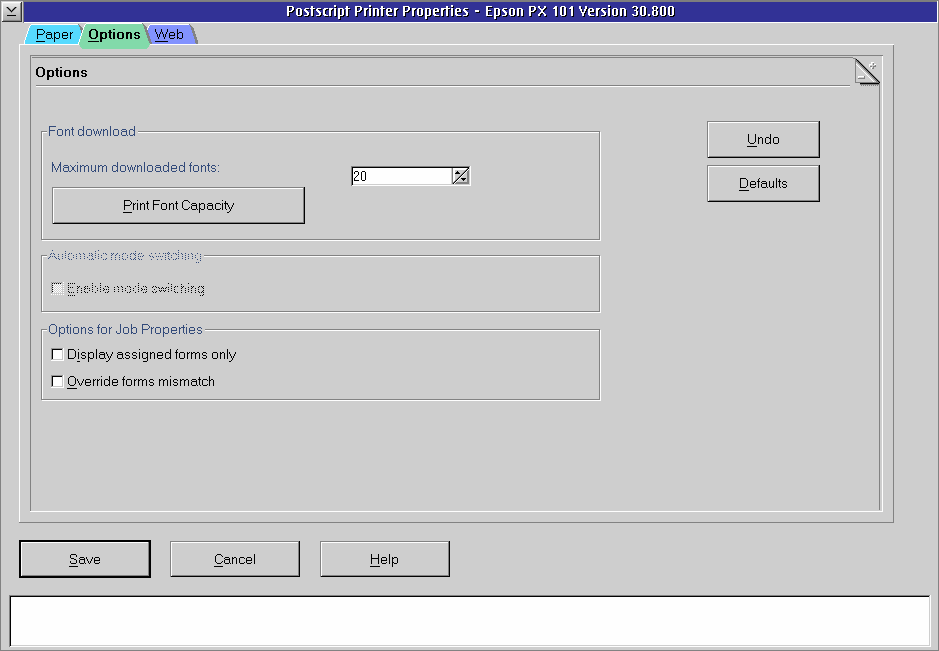
- Set any other printer properties that you deem appropriate. Personally, I like to set the printer object view to Detail.
I also suggest editing the default driver properties (by double-clicking on the driver name) and bumping up the maximum number of downloaded fonts on the Options page — my rule of thumb is to allow about 5 fonts per megabyte of RAM in the printer. This can make large documents print a bit faster when using Type 1 fonts, and in the case of laser printers can also make a visible difference in print quality (although with a typical inkjet you probably wouldn't be able to tell).
- Close the printer properties notebook.
That should complete the setup. Now it's time to print a test page using the desktop printer object.
- Verify that
cupsd.exeis running before testing. - Drag-and-drop the file
\cups\share\cups\data\testprint.psonto the new desktop printer object. - Select Printer-specific when prompted.
You should get the CUPS test page printed.
The next test is to print a multiple-page document from your favourite word processor, followed by printing other document types from an arbitrary application (e.g. photos from PMView, web pages from Firefox, etc.) using your new OS/2 printer object.
If you have problems, you might want to check the CupsFaq (in particular the Troubleshooting section). You can also ask for help on the eCups development list.
Have fun and thanks to Paul Smedley for all his good work!
About this Document 
Contributors 
- Peter Brown (original author)
- Paul Smedley
- Ed Durrant
- Alex Taylor
Ed Durrant wrote a nice visual step-by-step guide for an earlier version of this HOWTO, which has now been moved to its own page.
Revision History 
| Revision 1 | 14/08/2008 | Peter Brown |
| Revisions to filenames | 29/12/2008 | Paul Smedley |
| Revisions to USB section | 29/03/2009 | Paul Smedley |
| Revisions to the list of required software and brief description of software sections | 11/04/2009 | Ed Durrant |
| Additional details about using USB interface and visual instructions around set up of CUPS web admin printer install | 12/04/2009 | Ed Durrant |
| Additional visual instructions around set up of OS/2 printer object to use CUPS attached printer | 13/04/2009 | Ed Durrant |
| Changes to the desktop printer object setup based on the later versions of the files for clarification | 10/07/2009 | Ed Durrant |
| Various formatting improvements and clarifications | 2010-11-08 | Alex Taylor |
| Formatting improvements and clarifications, continued | 2010-12-11 | Alex Taylor |
Added warning about the (hard-learned) pitfalls of prndrv -d | 2011-02-17 | Alex Taylor |
| Added links to table of contents | 2011-12-12 | Alex Taylor |
| Massive rewrite & reorganization of content (with all new screenshots). | 2011-12-19 | Alex Taylor |
| Added information about the eCups printer wizard. | 2012-11-06 | Alex Taylor |
Attachments (19)
-
cupsweb03a.png
(10.6 KB
) - added by 14 years ago.
CUPS - Add Printer (2)
-
obj_create01.png
(4.8 KB
) - added by 14 years ago.
WPS - Install New Printer Driver
-
obj_create02.png
(4.3 KB
) - added by 14 years ago.
WPS - Create a Printer
-
obj_port01.png
(4.8 KB
) - added by 14 years ago.
WPS - Install New Port
-
obj_port02.png
(1.4 KB
) - added by 14 years ago.
WPS - CUPS Port Properties
-
obj_port03.png
(5.7 KB
) - added by 14 years ago.
WPS - Printer Output Port
-
obj_props01.png
(5.7 KB
) - added by 14 years ago.
WPS - Printer Driver
-
obj_props02.png
(9.0 KB
) - added by 14 years ago.
WPS - Printer Job Properties
-
obj_props03.png
(5.9 KB
) - added by 14 years ago.
WPS - Printer Driver Properties
-
cupsweb01.png
(20.8 KB
) - added by 14 years ago.
CUPS web interface (Home page)
-
cupsweb02.png
(14.8 KB
) - added by 14 years ago.
CUPS web interface (Administration page)
-
cupsweb03.png
(12.2 KB
) - added by 14 years ago.
CUPS - Add Printer (1)
-
cupsweb04.png
(9.1 KB
) - added by 14 years ago.
CUPS - Add Printer (3)
-
cupsweb05.2.png
(12.8 KB
) - added by 14 years ago.
CUPS - Add Printer (4)
-
cupsweb06.2.png
(11.8 KB
) - added by 14 years ago.
CUPS - Add Printer (5)
-
cupsweb07.png
(8.3 KB
) - added by 14 years ago.
CUPS web interface (Printers page)
-
cupsweb08.png
(12.7 KB
) - added by 14 years ago.
CUPS web interface (printer details)
-
cupsweb05.png
(12.8 KB
) - added by 14 years ago.
CUPS - Add Printer (4)
-
cupsweb06.png
(11.8 KB
) - added by 14 years ago.
CUPS - Add Printer (5)
Download all attachments as: .zip